A complete walkthrough from getting into the city through to its final boss.
Unless you’ve done this, you won’t be able to enter the city.
Melina speaks up here and thanks you for accompanying her for so long.

Next to their leader you will find a corpse with1x Golden Rune (10).
you could farm theEnvoy’s Hornand theEnvoy’s Long Hornfrom them if you need them.
The corpse in front of it gives you1x Golden Rune (7).

The corpse on the left behind the wooden easel is clinging to10x Cave Moss.
Now two paths lead further:
Flatten the enemies in the building and get1x Preserving Bolusfrom the corpse.
The ladder leads into a room with a treasure chest that hides1x Perfume Bottle.

March up the stairs and you will find1x Seedbed Curseon the chair by the corpse.
Climb back down the ladder and enter the building to the south-west.
Walk down the stairs and you have three exits to choose from.

Thewestern exitleads into a courtyard with an enemy and a corpse containing1x Smithing Stone (6).
If you like, you’re free to jump over the railing here.
Theeastern passageis blocked by some crates that can be smashed.

In the storage room behind them you will find a corpse with10x Miranda Powder.
You cannot interact with this door, but at leastMiquella’s Liliesgrow here.
Further to the north-west is a knight that you could quickly flatten.

Behind the large wagon, the path branches off even further.
Leyndell’s main road
First, we activate the next Site of Grace.
Collect1x Golden Rune (9)from the trapped corpse behind the wagon and run in a south-westerly direction.

There are countless paths leading on from here.
You will come to a square with a fountain.
There are two paths here.

Sneak into the open building on the right and fall into the back of the massiveCrucible Knight.
You already know this pop in of enemy from the boss fight against the Spiritcaller Snail.
This one also packs a massive punch and should not be underestimated.

You will find1x Gravel Stoneon the left and1x Golden Rune (9)by the corpse on the path.
You will also discover1x Smithing Stone (4)on the left by a pile of corpses.
Two undead spearmen are standing next to a gravestone, guarding a valuableStonesword Key.

Explore this area later from the other side and collect theGolden Seedfrom it.
The soldiers in here will surprise you in the worst possible way: with bombs from the top right.
Be careful when you enter, as they will throw flash bombs at you from the top right.

The corpse on the ledge above will give you1x Clarifying Boluses.
At the bottom it’s possible for you to open another door and discover a treasure chest with1xStonesword Key.
This closes the circle for now.

Remember that you cancast a summon hereto make the fight easier.
The Avatar is more powerful than the other Avatars in the open world.
His moveset is identical to that of his colleagues, but he packs a much bigger punch.

Get spirit support and use it to distract him while you land heavy hits to break his stance.
As a reward we receive10,000 Runesand aLord’s Rune.
Let’s do some more exploring.

The corpse diagonally opposite leaves behind1x Golden Rune (13).
A Omenkiller awaits you at the bottom, who can leave behind a special mask.
The corpse on the right separates from1x Smithing Stone (6).

The second important item on the bed is theDeathbed Dress.
Now nothing stands in the way of a short break before we explore the surrounding paths.
In the north, go down the ladder to the sewers.

First march into the upper room on the right, kill the knight and grab1x Cracked Potfrom the corpse.
If you like, it’s possible for you to leave the building and explore the neighbouring area.
There, a Tree Spirit digs itself out of the ground.

You know what to do.
It drops aGolden Seed.
Remember the spot with this railing, we’ll come back here later.

In the opposite direction, the sewer leads to the left and down to the right.
It guards a corpse with1x Lost Ash of War.
Now head back and explore the sewer passage leading north-west.

On the left-hand side next to the rat and the hand you will find4x String.
Kill the beast, drop down and collect5x Fan Dagger, theErdsteel Daggerand1x Holyproof Dried Liverfrom the three corpses.
A ladder will take you back up from this smelly area.

You come out right next to the wing of the giant dragon.
Collect1x Dragonwound Greaseon the left in front of the gate and the path forks again.
Cross the north-eastern railing to get back to the area with the Tree Spirit.

To the left of the gate, some stairs lead into the familiar area.
To the right of these stairs you will find1x Golden Rune (8)in a bush.
Just opposite, go through an archway to find some dogs feasting on a carcass.

You will find3x Old Fangshere.
Now, return to the main street of Leyndell.
He will call in back up from a bunch more soldiers once alerted, so be on your guard.

At the end of the main road, fire up the huge gate that leads further east.
Kill the two monsters behind the house on the right to get3x Beast Blood.
The path forks at the stairs just beyond you.

First, go along the path to the right of the stairs.
Two dogs are guarding 1xGolden Rune (9).
Behind them on the left is1x Lightningproof Dried Liver.

Once it’s dead, you could claim1x Perfume Bottlefrom the corpse’s ribs.
The path ends here.
Then collect2x Soporific Greasenext to it and continue.

Behind the statue lies1x Somber Smithing Stone (6).
Back on the steps you will find3x Nascent Butterfly, while the corpse on the ledge has1x Exalted Flesh.
At the end, turn left into the building with a lift that can be activated with a lever.

After a few steps and soldiers, this will take you to a passageway, but it is sealed.
Morgott is the boss in the capital and you must defeat him before continuing here.
At least we can still snatch theFlamedrake Talisman +1from the corpse, though.

Now, we must continue our exploration elsewhere.
Dragon’s Wing
And lo and behold: the dragon’s wing is now accessible.
The ladder next to it leads to a knight who can easily be knocked over the edge.

The corpse provides us with5x Gravel Stone.
A little further on, you will finally find the next Site of Grace ‘Western Capital Rampart’.
At this point, the accessible path splits up again and there is a lot to pick up.

Alternatively, you canjust jump straight to our Godfrey boss fight walkthrough.
More importantly, there are two staircases here.
Activate the lever to fire up the gate below, then go back upstairs.

The huge, statuesque gargoyle standing in the area is guarding aGolden Seed.
Luckily, you might lure him to the staircase and fight him from above.
He will drop aGargoyle’s Halberdand defeating him will take him out for good.

It won’t respawn when you rest at a Site of Grace.
The corpse on the ledge provides us with1x Smithing Stone (6).
The course of the level splits up after the gargoyle.

On the way up, there are twoGrave Warden Duelistspatrolling, like the boss from the Murkwater Catacombs.
These ones have a bit more punch, so take it slowly and methodically.
Their grab attack in particular can quickly cause a nasty amount of damage.

With luck, he will drop aDuellist Helm.
Plus, the corpse next to him on the stairs will give us theRitual Shield Talisman.
On the left, behind some empty rooms, is a corpse with theStar Fistarmament.

The corpse on the cliffs has a1x Smithing Stone (5)to loot from it.
Let’s go back to the last Site of Grace first, though.
Right next to this rooftop you will discover another entrance to the neighbouring building.

The rooms look exactly like theRoundtable Hold, and we find quite a few items here.
Immediately to the left in the room where the Smithing Master Hewg would normally stand is aSanctified Whetbladeand aHammer.
The room next to it holds theGesture ‘By My Sword’and1x Hero Rune (1).

In the adjoining corridor, you’ll also find a corpse that contains1x Seedbed Curse.
This completes your exploration of the area.
There are also20x Black-Key Boltshere.

Go through the open double doors to the north-west and you will enter the main hall of the building.
Pull it anyway, as it will open a path you’ll come to later.
Once you’re at the top, you will discover the next Site of Grace ‘Divine Bridge’.

Caution: There may be a bug at this point.
This means that you may be trapped.
If you run straight ahead, he shouldn’t hit you.

Pay attention to his movements, and especially the moment when he finishes a very strenuous attack.
You’ll be hit hard by this, so dodge to the side to avoid taking too much damage.
On defeat he’ll drop80,000 runesand anotherTalisman Pouchfor your inventory.

Then, jump onto the thick root on the left and follow it south-east to the building.
Drop down and you are back on the root in the direction of Godfrey.
Return to the western exit from the refuge and down the stairs behind it.

We come to a small building with a lever for a lift.
Go down and follow the steps to a message on the floor: “Only regression reveals secrets”.
Next, defeat the two Perfumers and collect5x Holy Greasenext to the tree.

Continuing eastwards, you will see some footprints before they disappear.
Here, you will recognise a Crucible Knight by the stairs.
you’re able to only continue here by jumping over the railing onto the roof to the north-west.

Now, fast travel back to the Refuge to take the Eastern Exit.
There is nothing in the left pavilion, but6x Holy Greaseon the right.
Climb up the root and out of the building on the right.

Go back up the root and follow the path to the north-east to reach the queen’s bedchamber.
The second important thing in this room is the Incantation ‘Blessing of the Erdtree’.
when you’ve got completed everything and are ready for the next boss, take the exit.

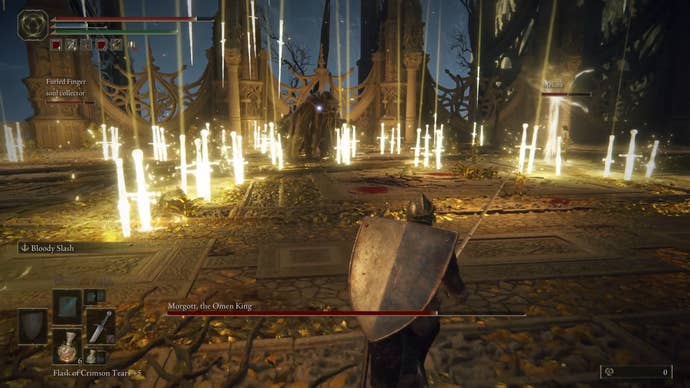
The steps lead to the boss arena ofMorgott, the Omen King.
This Legendary boss is a mandatory boss, and must be defeated to progress through the main questline.
Next destination: the Forbidden Lands and the Consecrated Snowfield.